How to Use Custom Controls
- Charles Evans (Unlicensed)
Analytics
You can enhance your App by using the flexibility within FAB to create your own Custom Controls.
If you require use of a User Interface that is not yet available within FAB then you can add your own custom control.
This example covers introducing a Custom Control that has two controls within it, FileUploader and a Button.
It also covers controlling the visibility of the new Custom Control.
Finding the custom control that you require can be obtained by using the standard SAP UI5 Demo Kit. Search for the Demo Kit using Google - 'SAP UI5 Explored'.
- https://sapui5.hana.ondemand.com/explored.html
- Search for the UI control that you want to use. For this example try File Uploader.
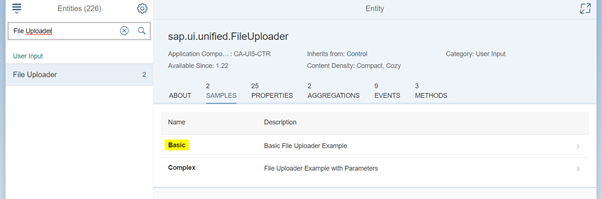
3. Click on Basic followed by the Show Source Code icon highlighted below.

4. Pick up the code that you require from the SAP UI5 Demo Kit and have it ready to paste into a Custom XML area of your FAB form.
5. In this example the Custom control is going to have two UI’s. The FileUploader and a Button.
They are only going to be visible when a check box is ticked.
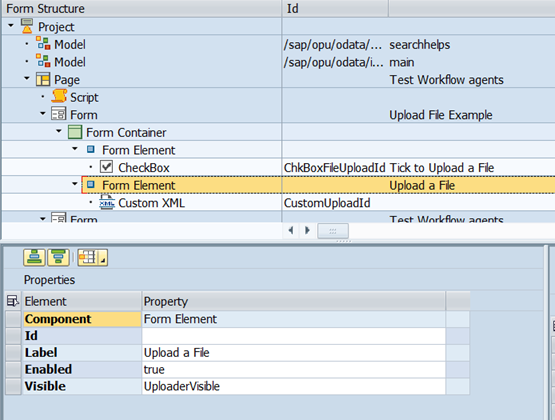
To control the visibility of the new Custom Control that you are about to introduce Create two variables.
ChkBoxFileUpload and UploaderVisible (boolean and default to false).

Create a Check Box Control with actions when ticked or unticked.
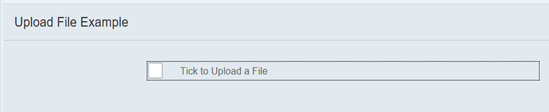

When the Check Box control is ticked the Custom Control (with two UI’s) that you are about to introduce become visible.
a. Define a FAB Custom XML within the Form Element. Its visibility is controlled by the UploaderVisible variable.
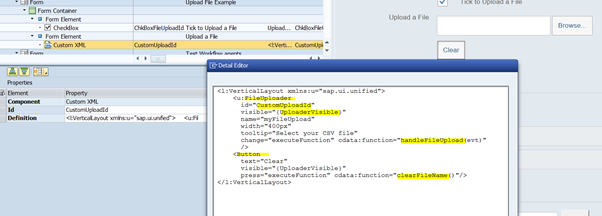
b. Now paste the Custom XML into the Custom XML Definition. The Custom XML defines two controls.
The FileUploader control and a Button.
It also makes reference to two functions that you have to provide in the script of your FAB application.
The custom control has been slightly adjusted from what was picked up from SAP UI5 demo kit.
The id has been adjusted to have the name used within FAB, the visibility variable has also been adjusted to use the name defined within FAB.
The two function names are matching what is available within the FAB script.
c. Place the functions into the script.
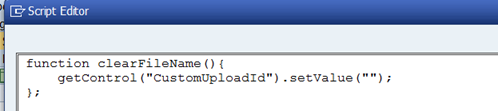
The clearFilename function serves to clear out the name that is placed in the File Uploader control after browsing.
By pressing the Button with the Clear text FAB executes the clearFilename function in the script.
This serves to clear out the name that you may have in the File Uploader after browsing.
d. After browsing, the name of the chosen file is New Features.docx.
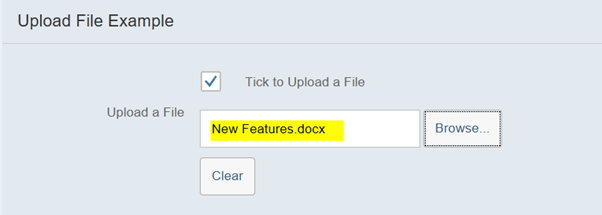
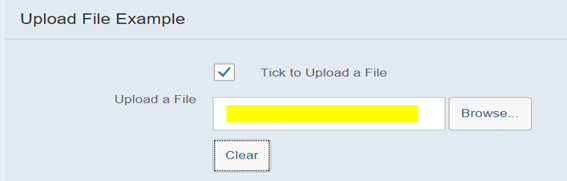
When the Clear Button is pressed the function clearFilename is executed and it serves to remove the file name form the input box.
Javascript code for clearing the filename:
Result
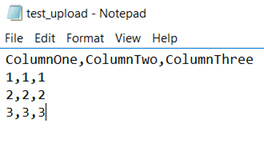
e. Now proceed to upload the data into a table on the form.
Create a file with three columns of data and have it ready so that you can browse and pick it up and have it placed into the table.
f. Define a table in your FAB application where the data can be placed. Make it a table without a Toolbar (No ToolBar = true).

Now place the Javascript code into the script.
It is executed when there is a change to the FileUploader control.
See snapshot in step b, a change takes place because the Browse Button is used to choose a file.
change="executeFunction" cdata:function="handleFileUpload(evt)"
The Javascript code assumes you are supplying a csv file with three columns of data in each row (step e).
g. The script picks up the file and then moves over the lines starting at 0 (heading) followed by 1,2… etc.
The script ignores the heading row (row 0) and only deals with lines when (i !=0). (i!=0) means i is not equal to 0.
Since the header is on row zero it is ignored and not considered for loading into the table.
The rows are pushed onto the oData table variable defined by var oData = [];
When all of the rows have been retrieved from the file they are bound to the Table using setField(“TestTable”,oData);
Not included here is the option to also attach the uploaded file to the form/application.
function handleFileUpload(evt){
console.log("file chosen");
var file = evt.getParameter("files") && evt.getParameter("files")[0];
if(file && window.FileReader){
var reader = new FileReader();
reader.onload = function(evn) {
var strCSV = evn.target.result; //string in CSV
var oData = [];
var lines = strCSV.split("\n");
for(var i in lines){
if(i!=0){ //headings row
var cols = lines[i].split(',');
if(cols.length===3){
var oItem = {};
oItem.ColumnOne = cols[0];
oItem.ColumnTwo = cols[1];
oItem.ColumnThree = cols[2];
oData.push(oItem);
}
}
}
setField("TestTable",oData);
};
reader.readAsText(file);
}
};
h. Results of the File Upload
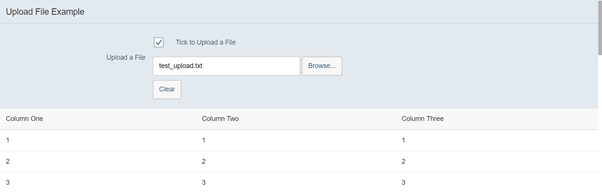
In this example the columns of the table are defined as text and thus are unable to be changed after upload.
The columns of the table could be selectively defined as input and/or text and can then be updated after upload.
In this next example column one is defined as text (not editable) and columns two and three as input.

Other controls notes
Navigation List
- On item select, the key can be selected by using the following codes:
var a= evt.getParameters().item.getBindingContext().getObject();
- On item select, the key can be selected by using the following codes:
Remove app in Shell
function iniPage() {
thisFormsController.getView().oParent.oParent.oParent.oContainer.oParent.setAppWidthLimited(false);
};