Creating an Approval Matrix Configuration App
- Charles Evans (Unlicensed)
Analytics
Matrix App Creation Instructions:
- Open the FAB workbench (Transaction Code: /IQX/FAB)
- Click Create New Project.

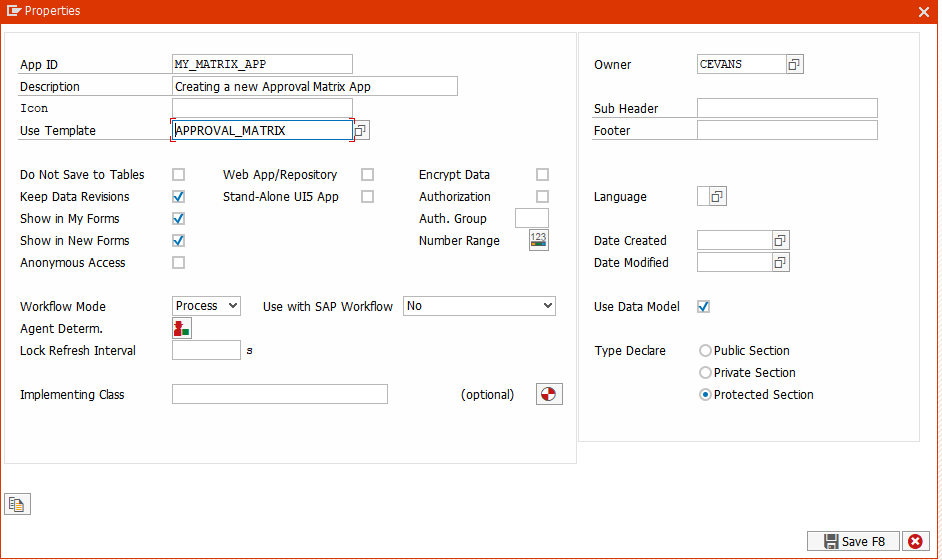
Select the APPROVAL_MATRIX template in the Use Template field.
Naming Convention
Name your new app by appending _MATRIX to the end of the original app name.
e.g.
Original App: IQX_CAPEX_DEMO
Matrix App: IQX_CAPEX_DEMO_MATRIX
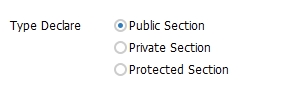
Add an Implementation class and set the Type Declaration to Public.
No methods need to be implemented in the implementation class. The purpose is so that the data model can be created as a type in the class that can then be accessed by the Main Application's ABAP exits.
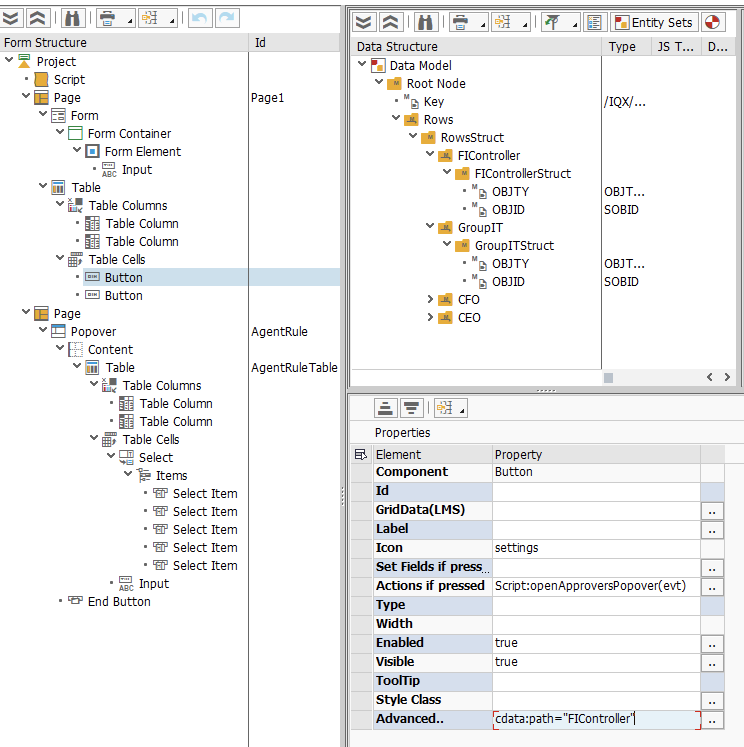
- You must then create a structure for each Role that you are going to allow users to configure. In the following example you can see that we are allowing for roles: FIController, GroupIT, CFO, CEO.
To create a new Role, simply use the copy and paste functionality on one of the existing roles and rename both the Table and Structure accordingly.
- If your approval matrix depends on another value (e.g. Cost Center, Company Code), then you must add that field(s) directly into the Rows Struct.
- Once your Data Model is correct, you need to adjust the configuration of the table so that the necessary columns are displayed. Note that if you have added additional fields (e.g. Cost Center), those should appear as the first columns in the table.
- For each of the roles, you should add a Button to the table Cells collection. You must configure the following properties:
- Actions if pressed: Script:openApproversPopover(evt)
Advanced: cdata:path="FIController"
"FIController" in this example configures the button to the management of users for the structure in the Data Model called FIController. You will change FIController to match the role you are working with.
Configuring the Main Application to Leverage the Matrix Configuration:
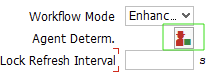
- Go into the Properties of the app and click the Agent Determ. button
Enter the name of the Matrix app, specify an App Key and click Save.
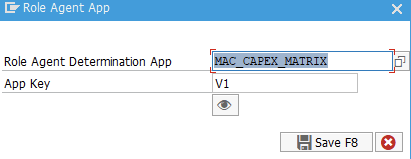
The App Key value should be the value that is saved in the instance of the Matrix Configuration App. As a default it can be V1 and can be increased (if necessary) as the configuration evolves over time. To set this up, open an instance of the Matrix app, supply a value in the Key input field and click Submit. This saves an instance of the Matrix configuration that will be used to configure the main application.
Implement the Determine approvers for Roles ABAP exit.
METHOD determine_approvers_for_role. FIELD-SYMBOLS: <fs_approvers> LIKE LINE OF ct_approvers. DEFINE add_agent. APPEND INITIAL LINE TO ct_approvers ASSIGNING <fs_approvers>. <fs_approvers>-approval_level = i_level. <fs_approvers>-node_id = i_node. <fs_approvers>-role_id = i_role. <fs_approvers>-zinstance = i_instance. <fs_approvers>-objty = ls_agent-objty. <fs_approvers>-objid = ls_agent-objid. END-OF-DEFINITION. MOVE-CORRESPONDING CR_DATA TO GS_DATA. * Other Approvers are retrieved from Role Determination Configuration App IF io_role_determ_app_data IS SUPPLIED. IF io_role_determ_app_data IS NOT INITIAL. FIELD-SYMBOLS: <fs_fdata> TYPE any. DATA: ls_data TYPE zcl_mac_capex_matrix=>t_data. "<-Implemtation Class of Role Determination App here. T_DATA must be Public ASSIGN io_role_determ_app_data->* TO <fs_fdata>. MOVE-CORRESPONDING <fs_fdata> TO ls_data. DATA: ls_rows LIKE LINE OF ls_data-rows, ls_agent LIKE LINE OF ls_rows-sourcing. LOOP AT ls_data-rows INTO ls_rows WHERE BusinessUnit = gs_data-OperatingUnit. "where... CASE i_role. WHEN 'Sourcing'. LOOP AT ls_rows-sourcing INTO ls_agent. add_agent. ENDLOOP. WHEN 'Fin Support'. LOOP AT ls_rows-finsupport INTO ls_agent. add_agent. ENDLOOP. ENDCASE. ENDLOOP. ENDIF. ENDIF. ENDMETHOD.- The following changes should be made in the above code:
- Line 22:
- DATA: ls_data TYPE zcl_mac_capex_matrix=>t_data.
- zcl_mac_capex_matrix should be replaced with the name of the implementation class of the Matrix app you created.
- Line 29:
- LOOP AT ls_data-rows INTO ls_rows WHERE BusinessUnit = gs_data-OperatingUnit.
- If you created any additional value fields (e.g. Company Code) you should create a Where clause that checks that field against the GS_DATA value. The above sample shows that the field in the app is Operating Unit and the field in the Matrix app is BusinessUnit.
- Line 33:
WHEN 'Sourcing'
Sourcing is the name of the role as defined in the Workflow configuration.
Ensure that the name in the string literal is spelt EXACTLY like the Role in the workflow configuration. Typos will still compile however the code will not be able to correctly determine the approvers for the role.
- Line 35:
- LOOP AT ls_rows-sourcing INTO ls_agent.
- The sourcing should be changed to the Table structure in the Matrix configuration app that contains the configuration for the Sourcing role
- Line 35 - 37 demonstrate the configuration of one role. You should copy this as many times as you have roles in your application.
- Line 22: