1.2.2 FAB Workbench (/IQX/FAB)
- Elzette Olivier (Deactivated)
- Andre Reforma (Deactivated)
- Orly trubik (Deactivated)
Owned by Elzette Olivier (Deactivated)
FAB Workbench overview
FAB Workbench contains a collection of tools used to develop, test and run FAB applications.
When the FAB Workbench is launched, there will be a Welcome Dialog box that provides the following options:
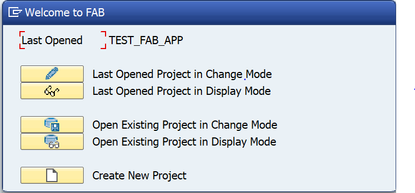
- Name of the last opened application
- Button to Change the last opened application
- Button to Display the last opened application
- Button to Choose and Change an existing application
- Button to Choose and Display an existing application
- Button to Create a new application
Once an application has been opened the workbench will display two sections:
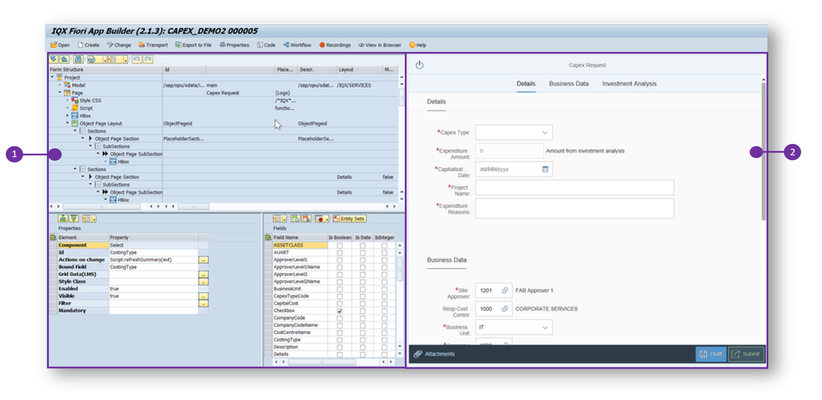
- Application definition: Contains the development and configuration area of the application, including form structure, properties and fields.
- Application preview: Contains an embedded browser that allows immediate preview of changes once the application is saved. Alternatively, it can immediately update after each edit if Live View mode is enabled.
Please note:
- When FAB Workbench is launched for the first time, the application's definition and preview sections will be blank. To display sections, a new application must be created and saved. Once this is done these sections will display on-going.
- If you have previously been working with FAB, the workbench will launch with the prior worked on application.
- You may be prompted to enter your SAP user name and password for the Gateway server. In some cases you may not be able to enter the user name and password quick enough before the workbench opens. This could result in the preview window not being able to show a preview of the current App. If this is the case, exit the workbench and start the transaction again.
Application definition
There are three main areas within the application definition section:
- Form Structure Tree: Displays the hierarchy of nodes in the application. This is the primary working space where Controls can be added.
- Properties Area: As nodes are selected from the tree, their properties are displayed in the Properties area, where each element's property can be set and modified.
- Fields Area: Fields make up the data model of the application. Fields will automatically display in this section if they are added against the 'Bound Field' element in Properties making the corresponding control 'bound' to the field, or they can be directly added to the section.
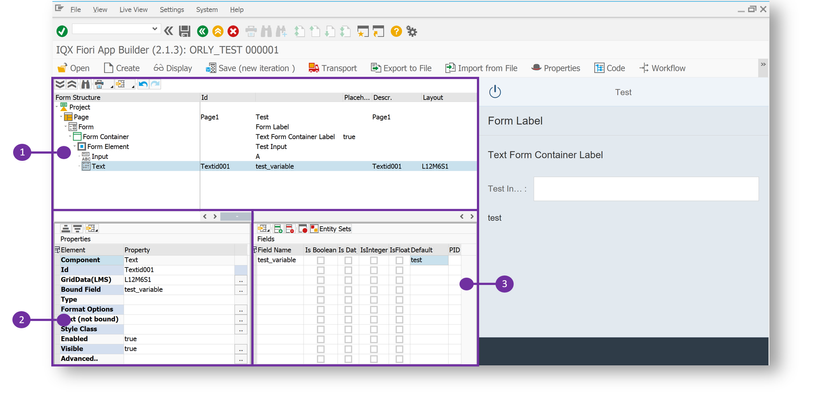
Example:
In the below example, the Text Control with Id "Textid001" is bound/linked to the Field "text_variable" in the Bound Field property. The value that "text_variable" has will be rendered in the preview browser as "test".
Toolbar
The FAB Workbench toolbar contains a set of useful buttons that provides easy access to core program functionality. If the screen is minimised, some buttons will collapse into a menu structure accessible on the right-hand side of the bar.
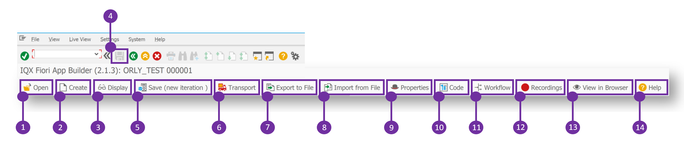
- Open: Used to open existing applications by launching the form search dialogue box.
- Create: Launches a dialogue box to capture the new application's form properties.
- Change/Display: This button toggles between change and display. When opening an existing applications, it will default to display mode.
- Save: This function allows any changes made to the application to be saved.
- Save (new iteration): This function creates and saved iterations (major versions) of the application and can only be access when the application is in change mode. Prior iterations of the application can be retrieved via the Open for search dialogue box. The current iteration number displays alongside the name of the form.
- Transport: This feature assigns the application changes to a transport request. This should always be selected before a version of the application is sent to a new environment.
- Export to File: Exports the application into a XML file format.
- Import from File: Allows the importation of a XML application file.
- Properties: Launches the application's form properties dialogue box.
- Code: Launches a dialog box for the associated ABAP methods executed by the application.
- Workflow: Launches the dialog box for configuring workflow stages and action buttons.
- Recording: Allow the recording of a transaction via BDC and inserts the fields into the form application.
- View in Browser: Opens a web browser to preview the application, similar to the application preview section.
- Help: Links to the FAB help site, which contains in-depth FAB documentation, release notes and demo scripts.
Step-by-step guide
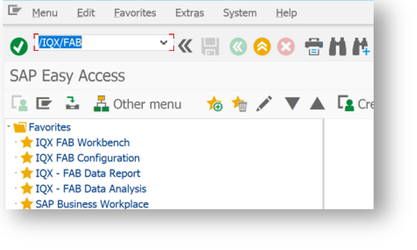
Accessing the workbench is done by:
- Navigating to the Command Bar
Enter the workbench transaction code (/IQX/FAB) and select the green tick or hit enter
Related articles